

💥In this article, I will be explaining about RESTful API and how we can create our own api using nodejs express.👨💻
What's an API??
Application Programming Interface (API) is way in which two computers can talk to each other. Its exactly like accessing a website from our browser but instead of clicking tabs and buttons, we write codes to explicitly request data from a server. API helps you communicate what you want to that system so it can understand and fulfill the request.
🔺️ For example we can visit Google maps to see the world maps or using restfulAPI to request the raw json data which we can use to build our own apps as well. Google Maps allows us to load the Maps JavaScript API into our web page.
🔺️Here is the entire code you need to create the map of Australia region:
// Initialize and add the map
function initMap() {
  // The location of Uluru
  const uluru = { lat: -25.344, lng: 131.036 };
  // The map, centered at Uluru
  const map = new google.maps.Map(document.getElementById("map"), {
    zoom: 4,
    center: uluru,
  });
  // The marker, positioned at Uluru
  const marker = new google.maps.Marker({
    position: uluru,
    map: map,
  });
}
How it Works??
🔺️Most APIs that are widely used nowadays are RESTful meaning they follow a set of rules and constraints known as representational state transfers (REST) which are used as standard facts for API developement for how the architecture of an Internet-scale distributed hypermedia system, such as the Web, should behave.
🔺️REST API is a way of accessing web services in a simple and flexible way without having any processing. It organizes data entities into a bunch of unique URIs ( Uniform Resource Identifiers)
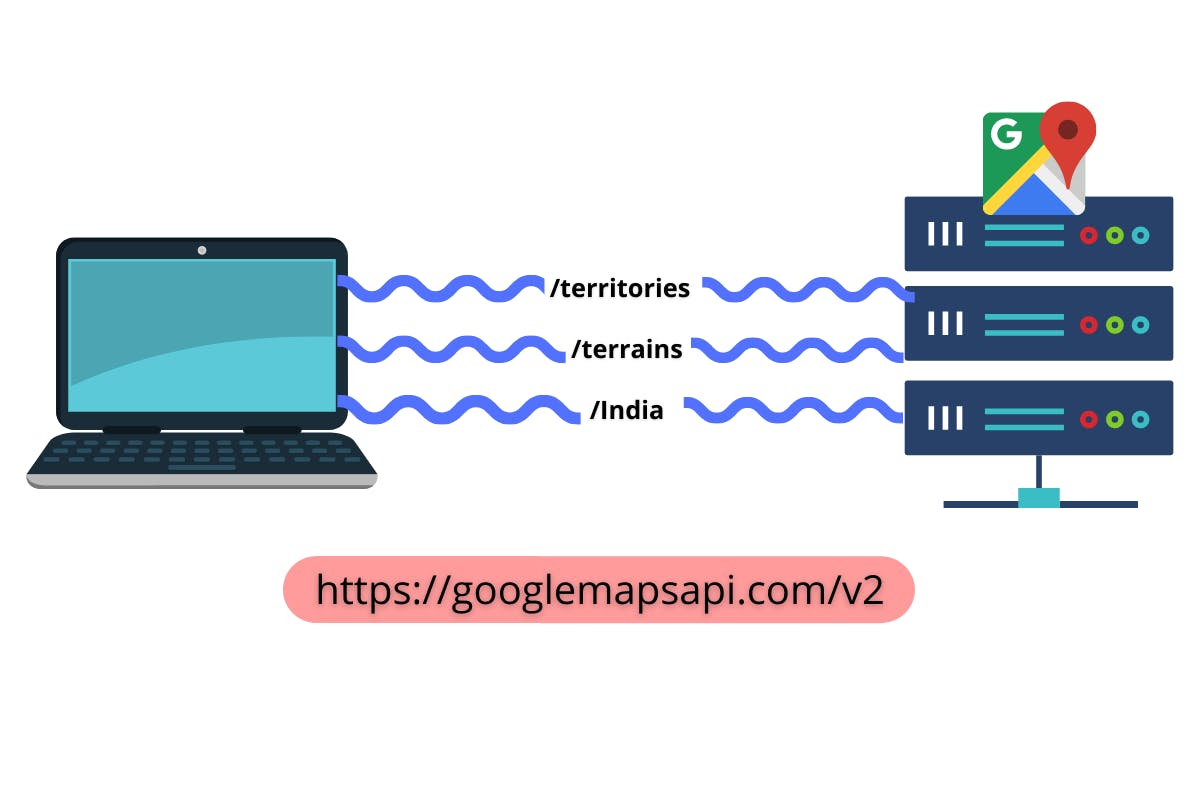
💥URIs differentiates different types of data resources on a server.
🔺️For example:
https://googlemapsapi.com/v2/india
Here "india" is the data resource and rest of the link is network location.
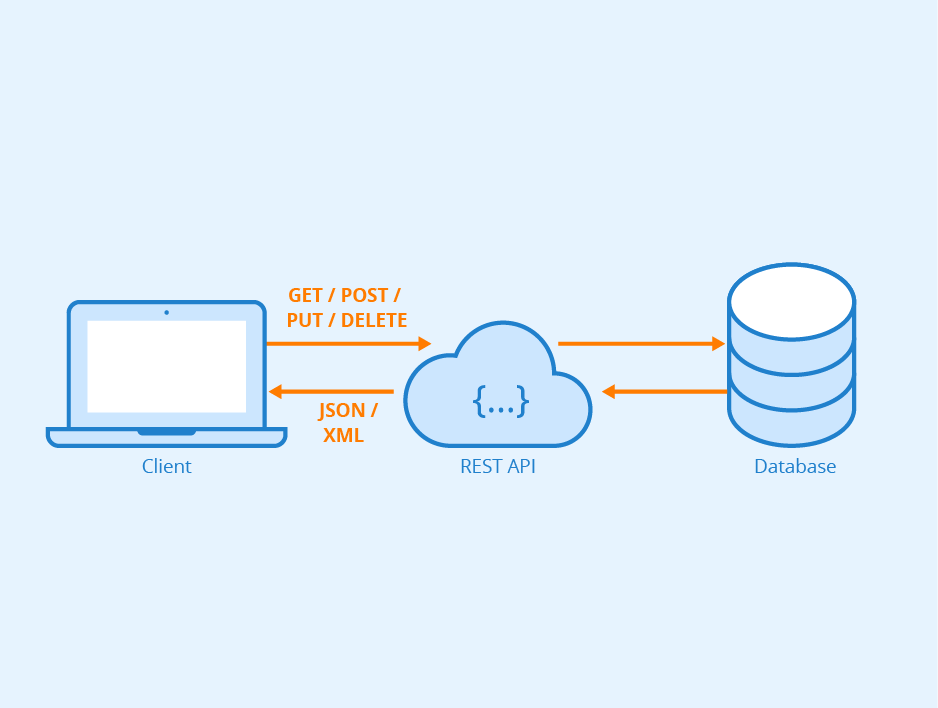
A client (your pc) can get data about a resource by making a request to that endpoint over "HTTP". Hypertext Transfer Protocol (HTTP) , is the underlying format that is used to structure request and responses for effective communication between a client and a server.
🔺️ The request message has a very specific format. The start line contains the URI that you wish to access which is preceded by an HTTP verb which signal your intent with the resource.

There are many types of requests, some basic ones are as follows:
1. GET request: means you only have to read the data.
2. POST request: means you have to create a new resource
3. PATCH request: means you have to update something
4. DELETE requests: means you want to delete a data.
You can find and read about more types from this link
- We have start line and then headers which contain metadata about the request.
- The accept header can tell the server in what format you want the data from it.
- The authorization header can be used to tell the server if you are actually allowed to make that request.
- Body contains a custom form of data which the server will recieve.
❗This request message executes some code usually to read from database that can then be formatted into a response message.
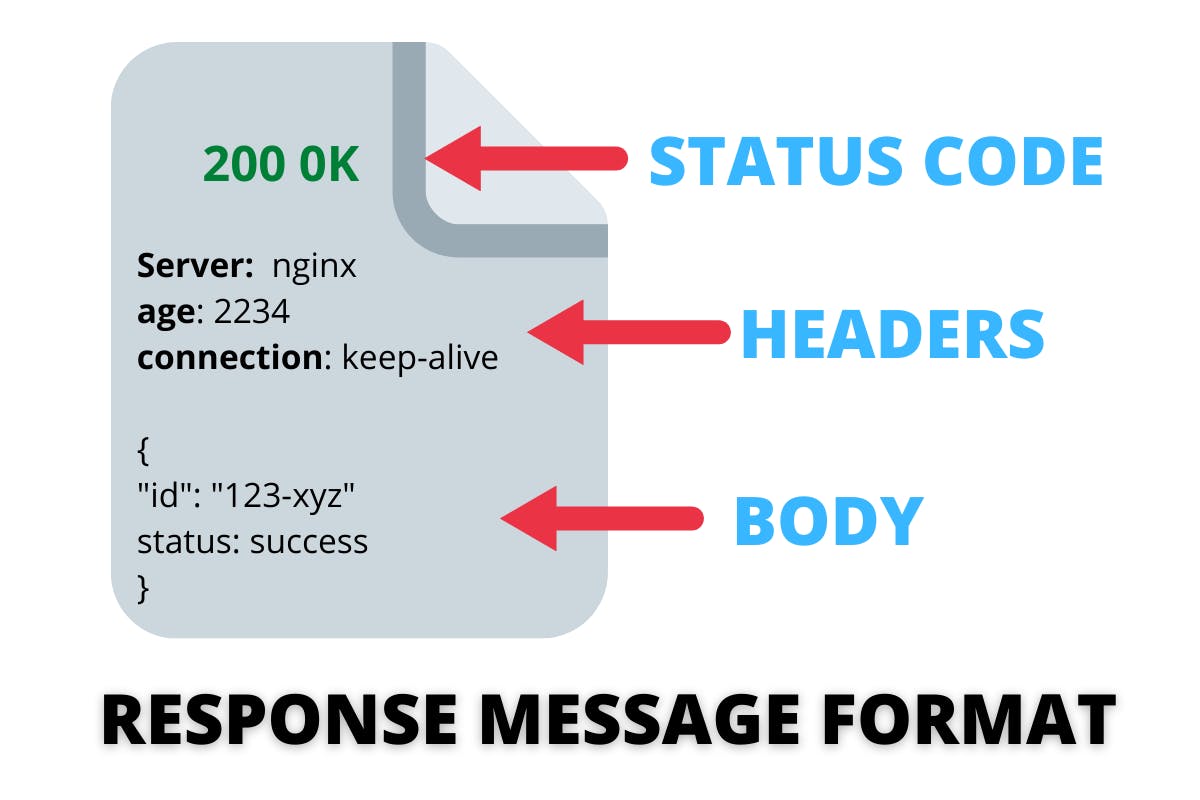
As you can see at the top is the status code which tells the client what happend to their request Code are like:
- 2** : smoothy sent
- 4** : something went wrong
- 5** : server failed
These headers contains information about the server that's followed by the response body which contains the data formatted in JSON format.
The architecture is stateless meaning both the server and the client dont need to store any information about each other and every request-reponse cycle is independent from all other communication.
Statelessness helps in scaling the APIs to millions of concurrent users by deploying it to multiple servers. Any server can handle any request because there is no session related dependency. Being stateless makes REST APIs less complex – by removing all server-side state synchronization logic.
Building Rest API from NodeJS Express
Express is commonly used to build restful apis and is very easy to learn. We will now see how to create different endpoints, tools in the cloud and API gateway.
🎯 We will first open an empty directory with any kind of editor. 👉 We need to first install nodejs first. Use this command to install it from your terminal in that directory:
npm init -y
This will create a package.json and give us info about the packages we can install in node like express.
🎯 Now then install express by using this command:
npm express
You will see express dependencies is added into package.json file.
{
  "name": "RestAPI",
  "version": "1.0.0",
  "description": "",
  "main": "index.js",
  "scripts": {
    "test": "echo \"Error: no test specified\" && exit 1"
  },
  "keywords": [],
  "author": "",
  "license": "ISC",
  "dependencies": {
    "express": "^4.17.3"
  }
}
🎯 Create index.js file and write the following code:
const app=require('express')(); //imports express function
const PORT=8080;

app.listen(    //tells to fire up the app on the port 8080
    PORT,
    ()=>console.log(`its live! on http://localhost:${PORT}`)
)
👉 Run the code by writing this on terminal:
node .
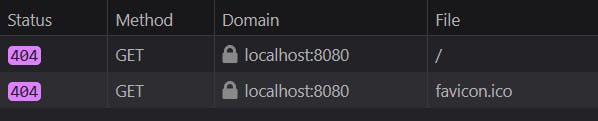
You will get 'error 404' since we havent entered any api but by inspecting and checking in network you can observe the request is sent as GET will be there
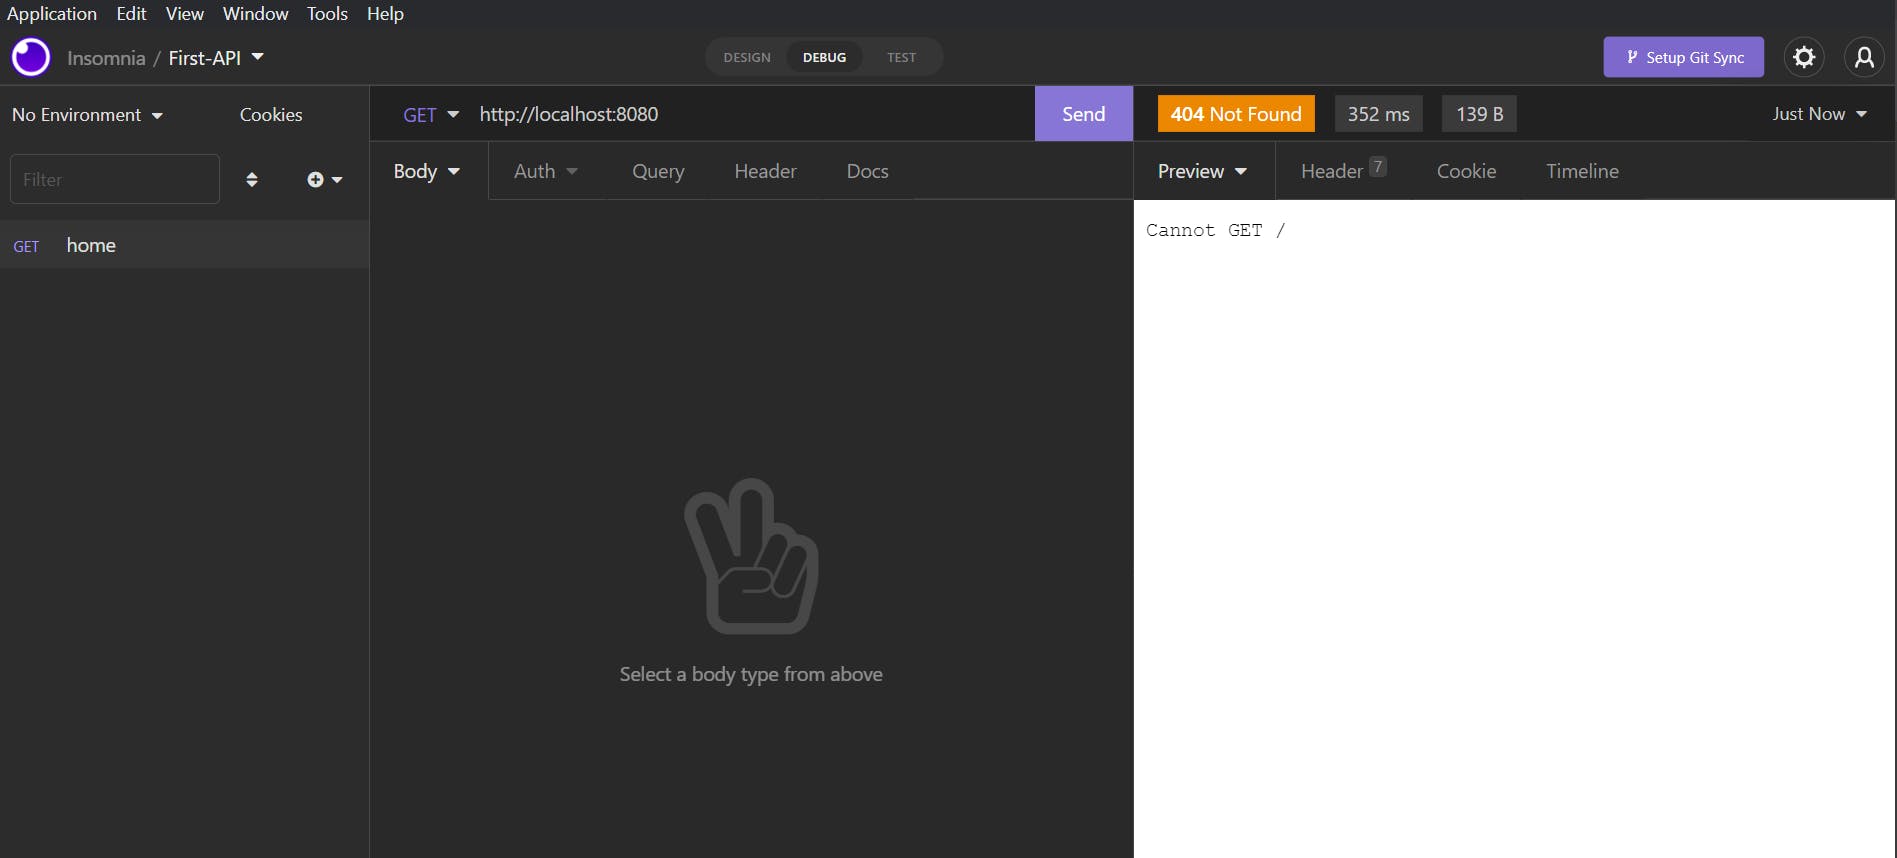
We will be installing an app called Insomnia which allows us to build, design and test better APIs through spec-first development.
🎯 Install it, create a document. Paste the URL at the top and then you will see something similar:
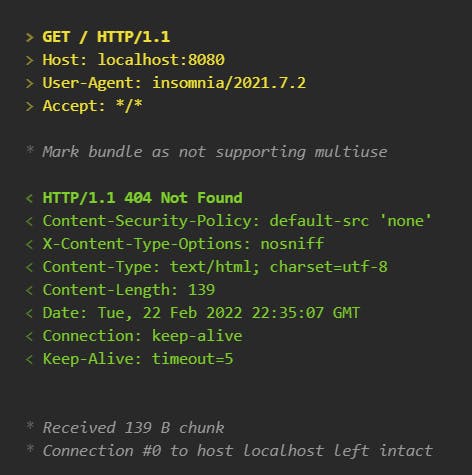
🔸️When you press "Send" you will see the response in timeline bar where request is in yellow and response is in green just like in format we discussed earlier.
👉Now we ad an endpoint in our js file by writing the following code:
const app = require('express')(); //import express function
const PORT = 8080;
app.listen( //tells to fire up the app on the port 8080
PORT,
() => console.log('its live! on http://localhost:8080')
)
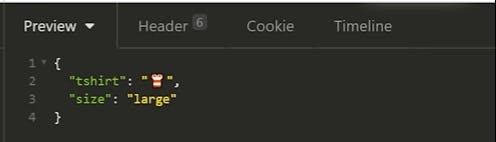
app.get('/food', (req, rep) => { //first arguement, server is set up with this endpoint
// runs this function when the route is requested by the client
res.status(200).send({
tshirt: '👕',
size: 'large'
})
});
- We pass a callback function as the second argument which will fire the callback function whenever the client requests that url to handle the request.
- The 'req' (request) is the incoming data and 'rep' (response) is the data we want to send back to the client.
- We can add status code and whatever data which is required as a payload.It will send this data back as json by default. Save the file and restart the server.
👉You will observe the following response in json form in preview:
🎯 We then create POST endpoint:
app.post('/tshirt/:id', (req,rep)=>{
 const {id}=req.params;      //id is being created
 const {logo}=req.body;

 if(!logo){
     res.state(418).send({message:'We need a logo!'})
 }
 res.send({
     tshirt:` with your ${logo} and ID of ${id}`,
 })
});
🔺️ Req object allows us to access info from the request message. 👉We go back to insomnia and change the GET to POST. In body section, we add a request body with the format of json
❗The express does not parse json in the body by default hence, we need to set up a middleware which tells the express to parse json before the actual data hits the function. Refactor your code and write:
const express = require('express')();
const app=express();
const PORT = 8080;
app.use(express.json()) //middleware 'json' is applied
👉 Now every request which goes will first go through this express json middleware which will convert the body to json.
🎯 Restart the server and send the request we previously wrote in body, you will see we get back a successfull reponse:

👉 If we dont enter the logo, we will get the following response:

We have created our own RESTful API from scratch successfully!! 💥💥
Thank you for reading the blog.🙌🏻📃
🔰 Keep Learning !! Keep Sharing !! 🔰
🚀 Feel free to connect with me :
- LinkedIn : linkedin.com/in/abhinav-kumar-9639b4143
- GitHub : github.com/abhinav2712
- Twitter : twitter.com/Abhinav10465018
Keep Growing and don't forget to have fun :) 🍻